- The 5 Principles of IT Customer Service Success
- The Compassionate Geek: Mastering Customer Service for IT Professionals (2nd Edition)
- Cisco ASA for Accidental Administrators (1st Edition)
- The Accidental Administrator: Cisco ASA Security Appliance (2nd Edition)
- The Accidental Administrator: Cisco ASA Security Appliance (Edition 2.1)
- The Accidental Administrator: Cisco Router Step-by-Step Configuration Guide
- The Accidental Administrator: Linux Server Step-by-Step Configuration Guide
- Tweeting Linux: 140 Linux Configuration Commands Explained in 140 Characters or Less
The 5 Principles of IT Customer Service Success
| Page # | Correction |
| 68 | It’s Maxwell Maltz, not Malcolm Maltz. |
The Compassionate Geek: Mastering Customer Service for IT Professionals
| Page # | Correction |
| 71 | First paragraph should say “Work with a partner…” |
Cisco ASA for Accidental Administrators: An Illustrated, Step-by-Step Cisco ASA Learning and Configuration Guide
10/31/15: I was just made aware of an embarrassing error in the table of contents in which the page numbers are off by 18 pages. In other words, for example, the page that is listed in the table of contents as page 23 is actually page 5. This is being corrected in edition 1.1. You can download a corrected Table of Contents here.
The Accidental Administrator: Cisco ASA Security Appliance, Second Edition
The current edition is 2.1, which incorporates the following corrections and updates. Click here for edition 2.1 errata.
| Page # | Correction |
| 25 | Step 10: In the last sentence in the description, it should read “…we’ll use the password p@ss5678” for consistency with the exercise step. |
| 35 | Step 2: Formatting error. The words “interface vlan1” should be bolded. |
| 36 | Step 6: The prompt on the second bullet should be “ciscoasa(config)#” |
| 41 | Step 1: Obviously, you’re probably not in a seminar. |
| 53 | Step 1: This isn’t an error as much as an update. I’m now recommending tftpd64 instead of the Solar Winds TFTP server. There’s nothing wrong with the Solar Winds product, but they make you register to download it. The tftpd64 product is excellent, it doesn’t require registration, and it includes syslogd and some other features. Download tftpd64 at https://pjo2.github.io/tftpd64/ |
| 68 | In step 4b, after entering the IP address of your ASA’s inside interface, push the radio button labeled Telnet |
| 75 | Cisco Secure Access Control Server has been discontinued and replaced by Cisco Secure Access Control System. |
| 95 | Step 5: This command continues at the top of page 96. The actual command is: no aaa authentication ssh console LOCAL |
| 96 | Step 6: To clarify, you should attempt to log in using SSH |
| 113 | In the Diffie-Hellman Group section, the last sentence should read, “Group 1 is 768 bits, group 2 is 1024 bits, and group 5 is 1536 bits.” |
| 128 | I have created several videos on various ways to authenticate VPN users, including RADIUS, Kerberos, and LDAP on my video channel at this link. |
| 154 | Step 45 is no longer necessary. |
| 155 | Steps 50 and 51 are not necessary since the DMZ sits behind a lower security level (50) than the Inside network (100). |
| 164 | In the second paragraph, second sentence, it should read, “The appliance has a single IP address and the inside and outside interfaces are on the same subnets.” |
| 166 | Step 8: For clarification, you can use a network or a host address here. If you choose to assign a network address, it must be the same network as where your management workstation is located. If you choose to assign an individual host address, it must be the address of your management workstation. (If you’re not clear on the difference between network and host addresses, spend some time reading TCP/IP tutorials or watching YouTube videos on IP fundamentals.) |
The Accidental Administrator: Cisco ASA Security Appliance, Edition 2.1
| Page # | Correction |
| 68 | In step 4b, after entering the IP address of your ASA’s inside interface, push the radio button labeled Telnet |
| 116 | Eliminate the parenthetical comment. It is irrelevant. |
| 151 | Insert an additional step (step 20a) just before step 21. Step 20a: Launch the Adaptive Security Device Manager, either in a browser window or by using the ASDM launcher, depending on how you installed it. |
| 163 | This is not a correction, but an update for anyone using ASA software version 8.4 or later. Cisco modified the steps for configuring transparent mode on appliances running software version 8.4 and later. I created a blog post here and a video here, both covering the updated steps. |
| 164 | In the second paragraph, second sentence, it should read, “The appliance has a single IP address and the inside and outside interfaces are on the same subnets.” |
The Accidental Administrator: Cisco Router Step-by-Step Configuration Guide, 1st Edition, Versions 1 and 1.1
| Page # | Correction |
| 57 | Press Enter after typing reload. |
| 63 | Step three: After entering the command ip address dhcp, press the Enter key. Then type the command no shutdown and press the Enter key. |
| 65 | Exercise 1.4 is numbered incorrectly. It should be Exercise 1.5. |
| 68 or in Kindle, location 1002 or 1422, depending on your reader. | Exercise 1.5 should be numbered 1.6. Step four: The correct command is show startup-config, not show running-config. |
| 70 | Step 10: This command must be executed in Privileged EXEC (enable) mode. Step 15: This command must executed in Global Configuration (config t) mode. |
| 84 | This isn’t a correction, but I thought this information might be helpful. The maximum # of hosts supported on each of the old classful network is determined by taking 2 to the power of “n” minus 2. The formula for determining the total number of available hosts on a class A network is 224-2 which equals 16,777,214, for a class B network, it’s 216-2 which equals 65,534, and for a class C network, it’s 28-2 which equals 254. |
| 88 | Figure 51 is wrong. The subnet mask in binary should be 11111111.11111111.11111111.11000000, as shown in the image.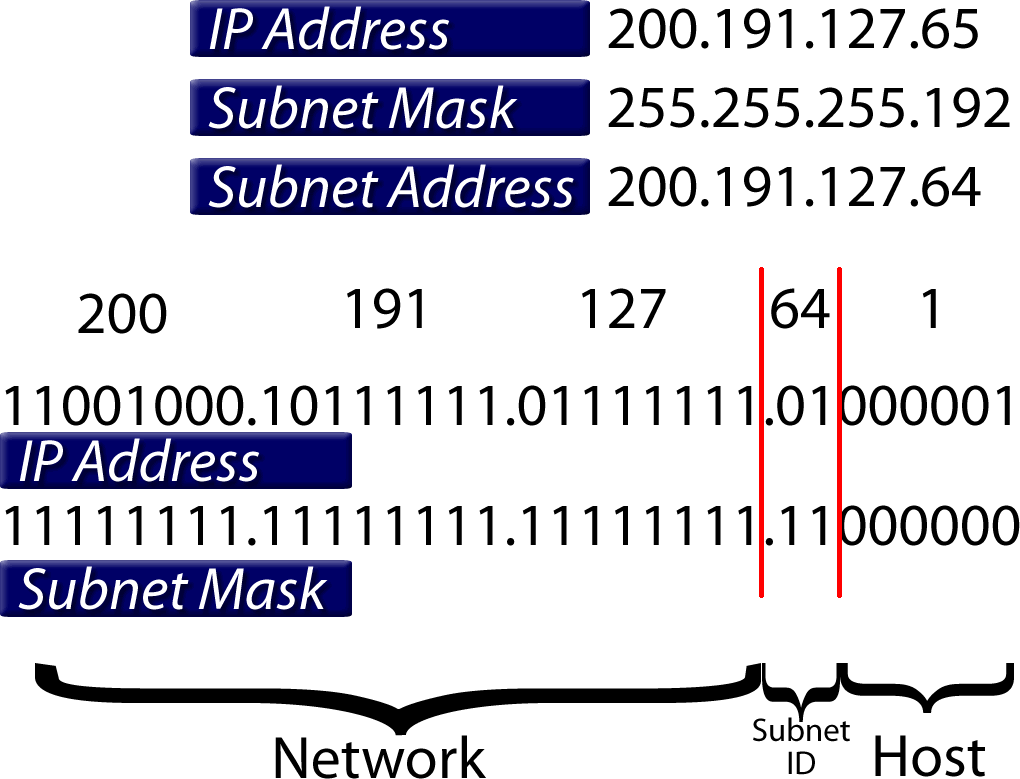 |
| 191 | This is additional information that you should know about RIPv2 and EIGRP.
The No Auto-Summary Command Allows Routers to Advertise Subnets
Both RIPv2 and EIGRP, by default, enable automatic summarization along classful network boundaries. In other words, if a router is connected to both the 192.168.1.32/27 and 192.168.1.64/27 subnets, automatic summarization will force it to only advertise the major network of 192.168.1.0/24. If you want the router to advertise subnets, you must use the router configuration mode command “no auto-summary”. Many network administrators make a habit of disabling automatic summarization, but it really depends entirely on whether you want subnets advertised or summarized.
|
| 232 | Diagram 7 has two typos in it. The Managers subnet ID should be 10.2.0.0/16 and the Sales subnet ID should be 10.3.0.0/16. |
| 233 | In the solution, the first configuration line should read: – router(config)#access-list 10 deny 10.3.0.0 0.0.255 |
| 236 | Diagram 8 has a typo on Router02’s interface configuration. The second interface in the list should be labeled G0/1, not G0/0. |
| 243 | Diagram 9 has the same typos in it as Diagram 7 on page 232. The Managers subnet ID should be 10.2.0.0/16 and the Sales subnet ID should be 10.3.0.0/16. In the solution, directly below the diagram, the first configuration line should read as follows:- router01(config)#access-list 101 deny ip 10.3.0.0 0.0.255.255 host 10.1.0.1 eq 23 |
| 257 | Step six: The steps must be performed in Global Configuration Mode. That’s probably obvious, but just in case… |
| 303 | Very early editions of the book (those with a “TM” by the title instead of a ®) included instruction and a graphic indicating that you should use the command ip access-group BlockRouter03 in to apply an IPv6 access-list. The correct command is ipv6 traffic-filter BlockRouter03 in. The correct graphic is shown here:  |
| 309 | Also, in very early editions of the book, RFC 2460 was inadvertently omitted from the list of recommended RFCs for more information about IPv6. |
The Accidental Administrator: Linux Server Step-by-Step Configuration Guide
| Page # | Correction |
| 50 | Students frequently ask what “grep” stands for. One of the most common definitions I’ve found is “global regular expression parser”. |
| 51 | Step 2: In the description, it should read “…in the demo3 directory:” Step 5: the command should include the “n” option. It should look like this:grep -Hrn “I grok Linux” /demo (the “H” tells it to print the filename for each match, the “r” tells it to act recursively, reading all files under each directory, and the “n” tells it to print line numbers. |
| 65 | Damn autocorrect! In steps 1 and 3, it should be two dashes before “help”, like this: chmod –helpls –help |
| 111 | Step 5: A word of explanation: “ro” means read only, “sync” tells NFS to reply to requests only after the changes have been committed to stable storage such as a disk drive. |
| 114 | Step 4: Again, autocorrect thought it knew what I meant. There are two dashes before “list”. Also, if you just want to see the runlevels where a particular daemon starts, you can append the name to the end of the command like this: chkconfig –list nfs |
| 131 | Step 7: The description should read “…present disk usage with the quotacheck command:” Step 10: You must specify the directory name following the command, like this:repquota /home |
| 146 | Step 23: After removing the directives, save and exit the file with the :wq command. |
| 160 | An additional note regarding sudo, passwords are cached. If you need to clear the cache, use the command “sudo -K” |
| 161 | In the last paragraph, it should read “…copies the file “file1” from the directory “common”…” (Removing the file extension .txt.) |
| 168, 169 | Exercise numbers are messed up. Here’s the correct numbering: Student Exercise 16.7: Finding Superuser User AccountsStudent Exercise 16.8: Checking User Account Logon HistoryStudent Exercise 16.9: Linux Root Password Recovery |
| 172 | In the section “How to use the “ps” command”:” remove the dash before aux, so it should look like this: ps aux |
| 181 | This isn’t errata, but I left out a great site for learning how to build Linux configs. Check out www.howtoforge.com (Okay, maybe it is an error since I should have never left it out!) |
Tweeting Linux: 140 Linux Configuration Commands Explained in 140 Characters or Less
| Page # | Correction |
| 88 | The graphic in figure 37.1 is incorrect. It is an inadvertent duplicate of the graphic for 36.1. |
| 244 | The two graphics are reversed. Figure 112.2 should be 112.3 and vice versa. |
